


By Juliet Rogers, Natalie Hogan and Meredith Gordon
Welcome to the second instalment of craft ideas for you to make with your little ones. We hope you liked the first edition. Let’s get crafting!
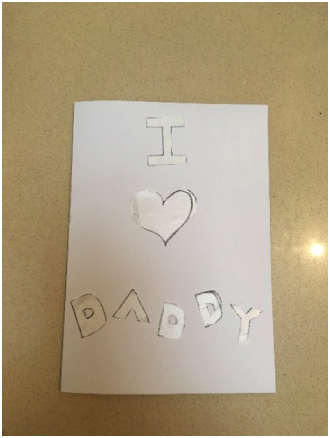
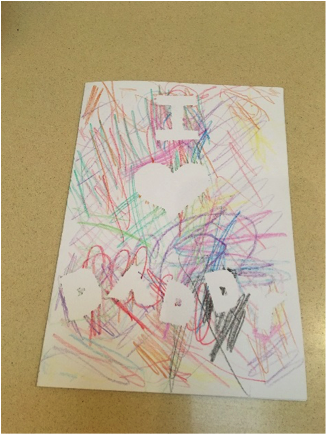
Personalised Cards
by Natalie Hogan
Materials- Marker (I used a Sharpie)
- A4 plain white card folded in half to make a card
- Whatever you choose to use to colour in the background (crayons, coloured markers, pencils, pastels, chalk)
- Masking tape (or if you are like me and didn’t have any you can use your lint roller)
- Scissors
Instructions
Draw the outline of your letters onto the tape and then cut them out and stick them on to the front of the card.
Have your child(ren) colour the whole page in lots of different colours. My 2.5 year old got a little bored with it, so you might need to join in to keep it interesting.
Peel off the tape carefully so that you don’t take any of the card with the tape. This is where the lint roller came in handy because it was just sticky enough to stay on the page but didn’t destroy our artwork when removing it.
Variations
Perfect for any occasion, just change your wording and the colours you use.
If you wanted to use paint instead then you can get your child to draw or write using a white crayon which won’t absorb a water based paint.
 |
 |
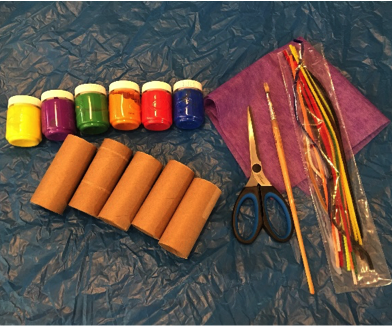
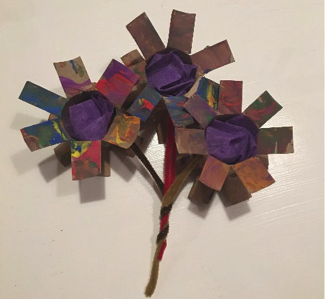
Toilet Roll Flowers
by Natalie Hogan
Materials
- Scissors
- Toilet rolls
- Paint
- Paint brush
- Pipe Cleaners or sturdy straws for the stems
- Tissue paper (I used the paper from a bouquet of flowers)
- Messy mat
- Painting shirt
Instructions
Cut slits all the way around the end of the toilet roll, about2 cm apart and one third of the way up the roll, on both ends of the roll.
Bend back the tabs on both ends to make the flower shape.
Have your little artist(s) paint them and allow them to dry
Poke a hole in the middle of the flower to attach the stems. I used a pipe cleaner that I had doubled over to make it stronger.
Fill the centre with issue paper
Variations
You could use a hot glue gun and glue something sturdier as the stem (like the larger straws).
 |
 |
 |
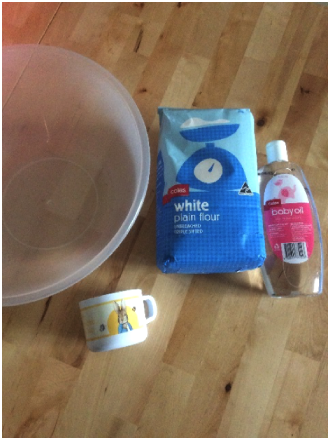
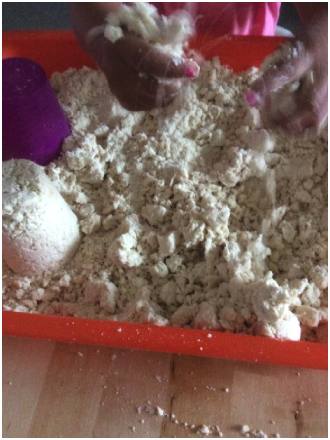
Cloud Dough
by Meredith Gordon
Materials
- Plain flour
- Baby oil
- Bowl
- Tray
- Gloves (optional)
Instructions
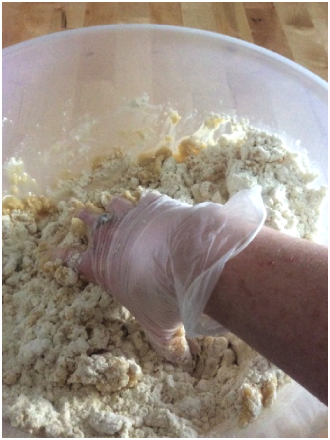
Mix 8 cups* of flour to 1 cup of baby oil (or one cup and two big squirts!) in a bowl.
Mix and knead well.
*(Note – any sized cup will do, so long as all are equal measurements)
How to use/play
The result is a soft, crumbly yet mouldable dough. Tip into a tray (I used a kitty litter tray as the depth is easy for little hands to explore in), and add cups, scoops, spoons and moulds to explore.
This is best suited for outside play, unless you don’t mind vacuuming up the fun later ?
Also best for non-mouthing bubs due to the use of baby oil.
Variations
Try a half/ half mix of flour and cornflour for “whiter” cloud dough, or experiment with varying grades of flour; add glitter (white, iridescent glitter works amazingly well!) and snowflake sequins for a “Frozen” theme (admit it, your kids are still hooked on it); add a few drops of powdered colour (either powdered food colouring or tempura paint).
 |
 |
 |
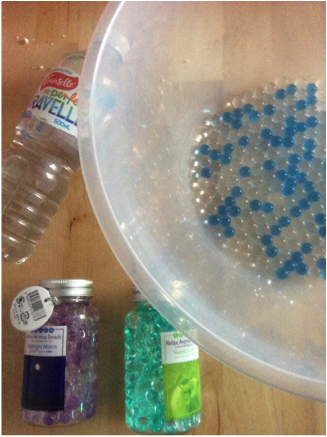
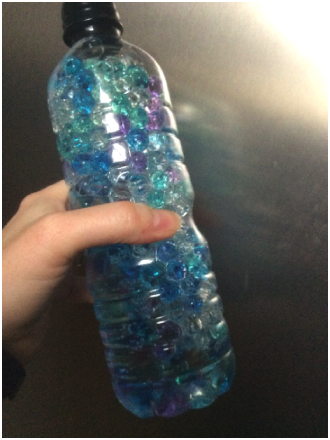
Calm Down Bottle #1
by Meredith Gordon
Materials
- Water beads*
- Water bottle
- Funnel
- Electrical tape
- Superglue (optional)
* I looked far and wide and couldn’t find any except for these aroma beads, which I picked up from DAISO. They’re essentially the same thing, just with a scent added to them. You can buy them online however, they come as teeny plastic beads and expand amazingly in the water – pre-schoolers to older kids would love watching the transformation and they feel AMAZING to play with)
Instructions
If you bought the aroma beads, wash thoroughly first (I suppose you don’t have to do this step, but I used three small bottles of beads each with its own scent and that was overpowering) or if you have actual water beads, then follow the instructions.
Peel off the label of the bottle of water and drink (or pour out) about 3/4 of the water.
Fill the bottle with the water beads (a funnel works very well here, those beads are bouncy!) about 2/3-3/4 of the way to the top (leave some room for expansion).
Now you can superglue the lid closed as well, but I’ve just taped mine with electrical tape.
Variations
Add glitter, experiment with varying colour combinations; use them with torches.
 |
 |
 |